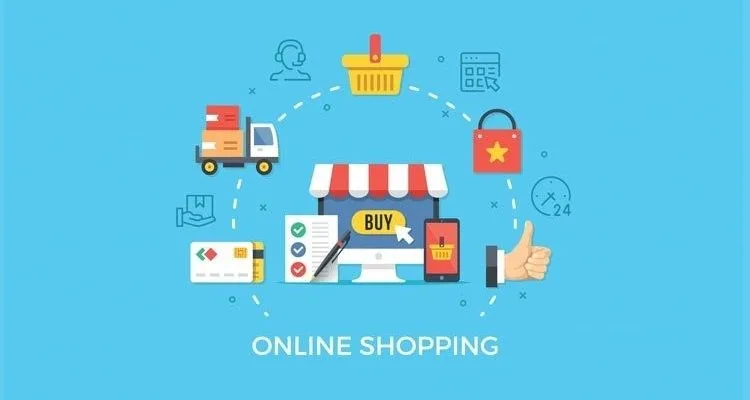
At a time when ‘perception consumers’ are on the rise — buyers look to purchase from manufacturers that share their very own values and beliefs— having your own brand store becomes massively important. Equally important is to be able to select the right sales channels so we can reach out to our prospect customers.
Today, Shopify is no doubt one of the best possible ecommerce website builders around. Although it’s very simple to use, it’s additionally very easy to make mistakes if you dive in head first without considering what it is you wish to achieve.
Remember, every enterprise concept requires a well-thought strategy and loads of effort for constructing a successful enterprise.
Within this article, we will assume that you have a business plan and have chosen products for your potential markets. We will focus on how to utilize and use Shopify service fully with that assumption in mind.
Registering Your Store
Visit Shopify.com or shopify.co.id to register. You can even search for Shopify to find one of their landing pages listed on top of any search engine.
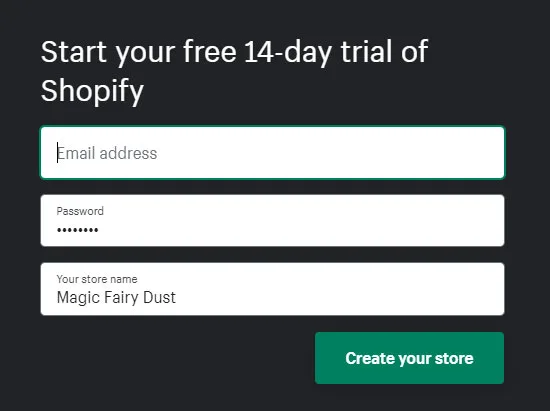
From there, you will need to enter your email address. It is best to use an active email address since Shopify will actually block your store automatically if you’re going to use an email address from untrusted domain name.
Once you’ve entered your email address, they will ask for more details regarding an account password and the Shop Name.
Your chosen password will be used as the master account’s password to this store and must be at least 5 characters long. As a reminder, it’s always a great idea to use a long and strong password constitutes of at least one of each letters, capital letters, numbers, and special characters.
For the store name, you must use at least 4 characters long and must use a name that hasn’t been taken. They will automatically check against their URL name database to make sure that your selected name has not been used before.
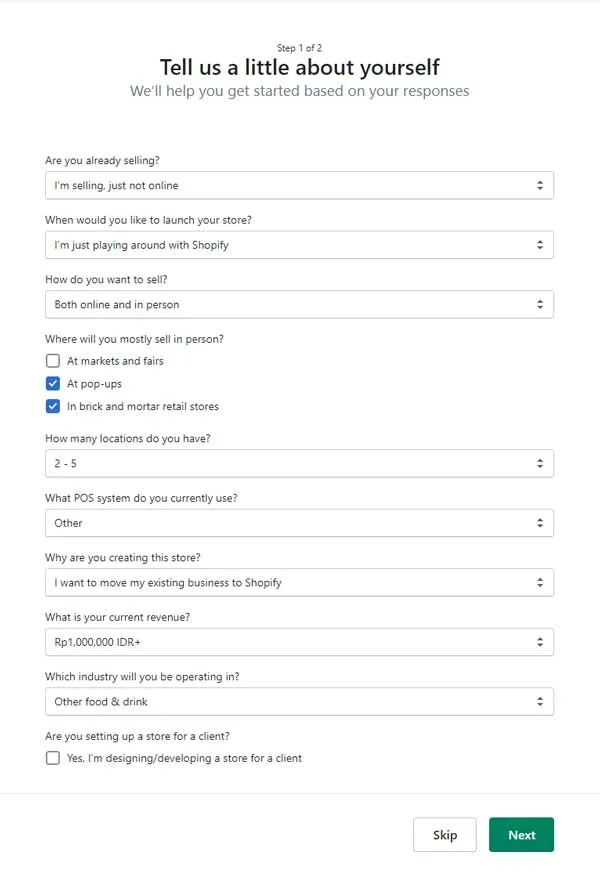
After you’ve completed these initial steps, you will be asked for some more details such as your selling experiences, your current revenues, and what industry you’re in.
They will auto guide you while completing this questionnaire to provide the right services and sales channels before creating your store.
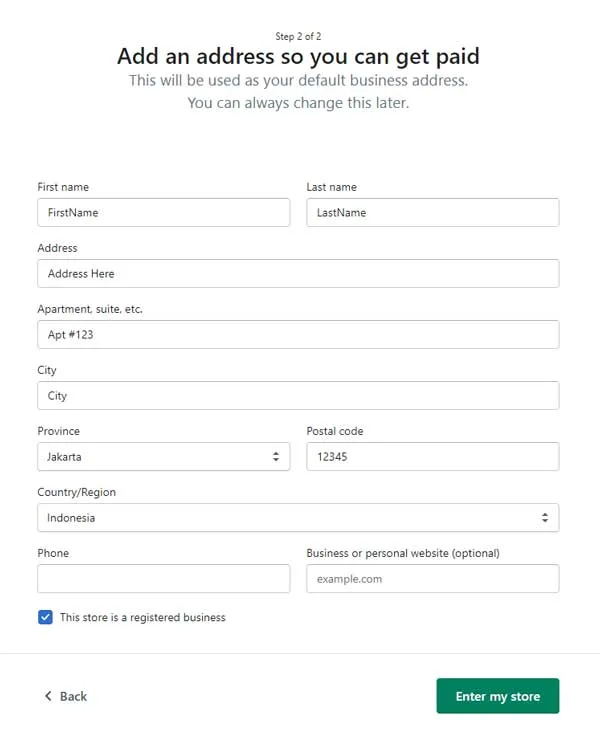
The last details will be about your store address or business address that can be used for processing payments and transactions.
This actually can be changed later so you don’t need to worry about entering the wrong address.
Once you click on Enter my Store button you will see the main menu and Shopify Dashboard.
On the left side of the dashboard is the main panel and it should look similar to the picture below (with the exception of the Point of Sale that will or will not appear based on your type of business).
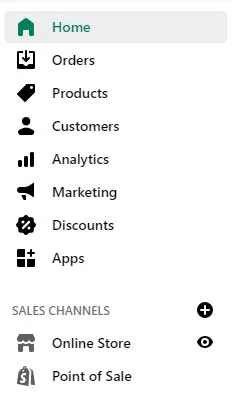
Once you’re able to see this, you have finished the registration process.
Congratulations! On to the next step, the design and theme of your store.
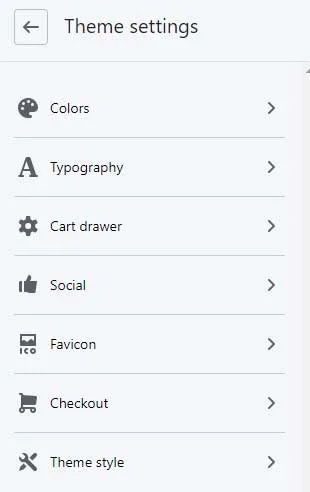
Customizing Your Theme
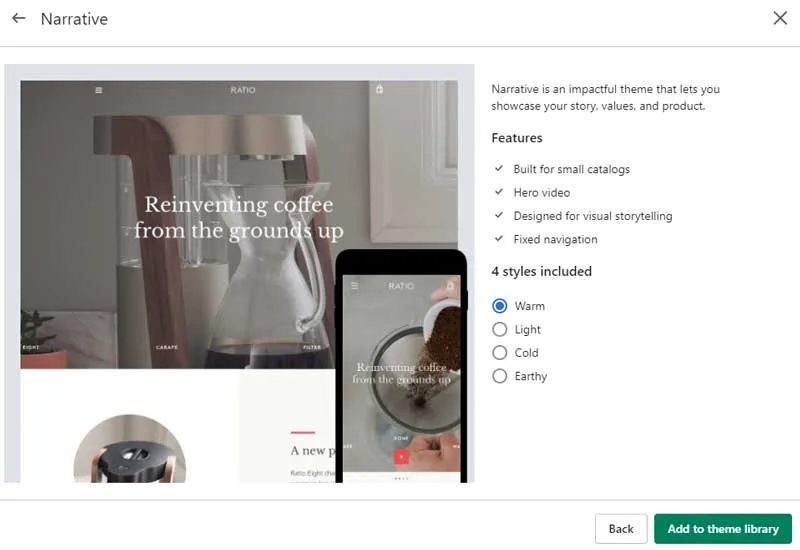
Depending on which Shopify plan you choose, it’s attainable to add many themes to your account. I’m going with Narrative, however you can decide something you like. Once you click the Add button within the theme, it’ll be added to your store.
Not all Shopify shops look alike, and Shopify themes are what help you achieve a particular look for your retailer and add a perfect look for your brand. In this Shopify tutorial, we’ll guide you thru the steps to turning into the proud owner of an online retailer.
To set up your theme, go under Sales Channels then select Online Store -> Themes.
Everyone starts with the Debut theme, however, we can choose from several free ones or purchase one from the Shopify Theme Store or from outside of Shopify. For the sake of this example, we will be using the Narrative free theme from Shopify.
It is highly advisable to consult with us regarding the branding of your business before choosing or purchasing a theme that you’d like as a baseline. After all, we always say that everything starts with why are you doing what you’re doing, the purpose, the soul, the vision of your business. Your branding should reflect that fiery passion within your business and so does your theme.
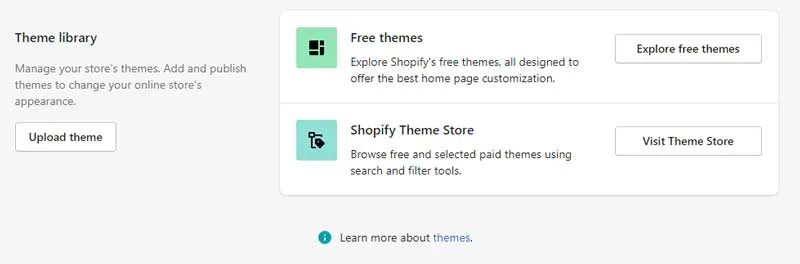
Once you’re ready, explore the free themes and select one that you’d like or purchase one from within Shopify by visiting the theme store or buy from other marketplaces out there and import the theme to your store by uploading it.
Every theme you’ve added should appear within the Theme Library and you can customize them as you’d like. You can hold up to a maximum of 20 theme within the Theme Library. Normally one theme will have multiple copies due to the development that’s happening behind the scene.
As with many themes, you’re able to select the styles that you’d like your theme to start with. The Narrative theme below has 4 styles: warm, light, cold, and earthy.
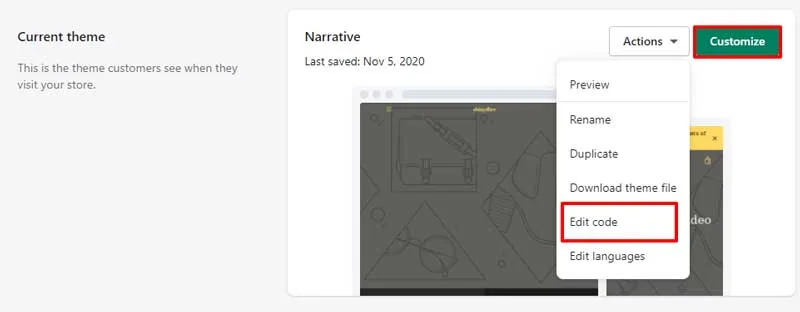
Let’s click on the Customize button to see what we have. This will bring us to the UI-based customization that we recommend for any non-technical person to customize the look and feel of your store.
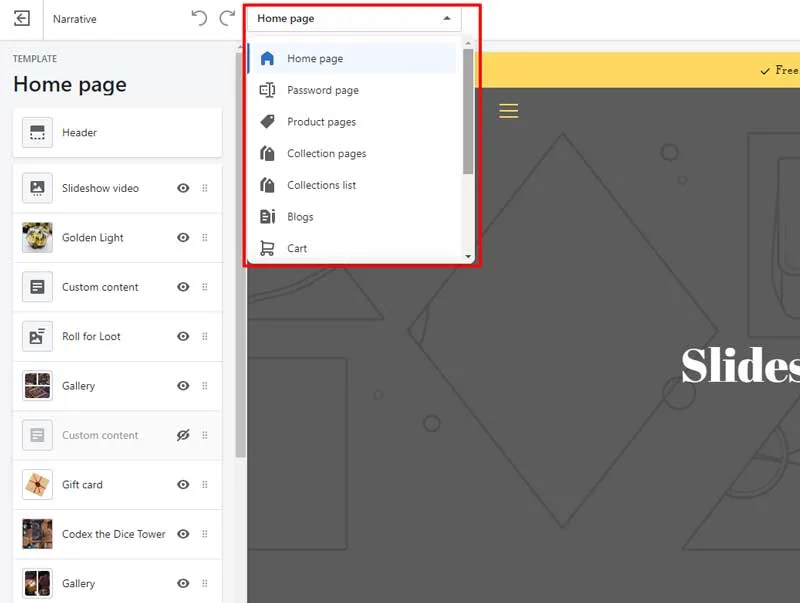
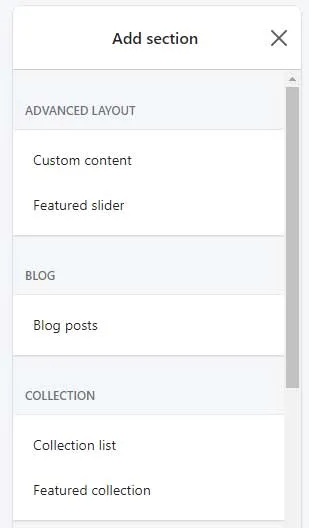
Turns out there are many different template pages that a theme controls. Most commonly, a theme customization will be able to update the UI easily for the home page, product pages, collection pages, collections list, blogs, and cart.
Let’s click on the Customize button to see what we have. This will bring us to the UI-based customization that we recommend for any non-technical person to customize the look and feel of your store.
Turns out there are many different template pages that a theme controls. Most commonly, a theme customization will be able to update the UI easily for the home page, product pages, collection pages, collections list, blogs, and cart.
By exploring all the options available under the customize menu, every business owner can jump start building their customized Shopify store without too much trouble. There are, however, limitation on how much we can change through the customize menu.
For more complicated changes and the little details that you want to work on specific ways, the Edit Code option is there for you. We recommend to consult with us if you’re going to change anything directly on the theme code, because they are not as well tested as the customize options that’s readily available.
To give you a picture, let say we want to have a custom functionality such as wholesale B2B area to order. This means there will be a need to have massive changes within the system, and the customize menu won’t be able to help you, but the Edit Code can, or better yet, the Shopify Apps might help.
Adding and Categorizing Products
If you’re going to sell something, you must have products within your store. On the home page of your store, you will see there are several tips that Shopify give you to get your store ready right away, including importing data from another store.
Import Products
Clicking on the Import Store button in the home page will get Shopify to ready an app for you that will specify the how-to and guidelines to import products from another platform into Shopify.
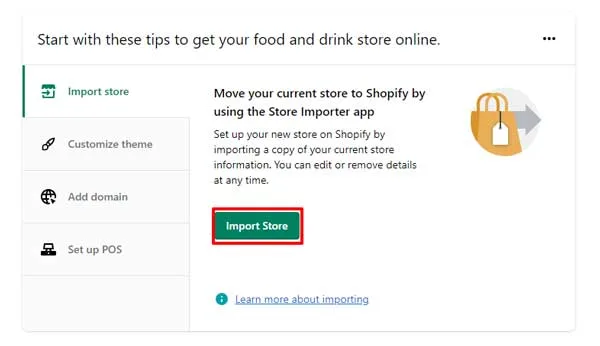
The goal of the Store Importer app is simply to provide you with the easiest method possible to fill your Shopify store with all the products and medias that you have.
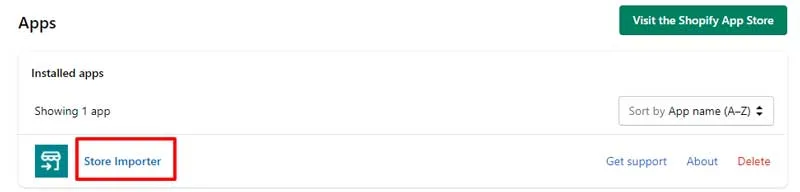
If you got lost after clicking on the Import Store button, you just need to go under Apps and click on the Store Importer app that’s already available within the list.
Once clicked, they will bring you a list of platform that we can choose as the source of our product import process.
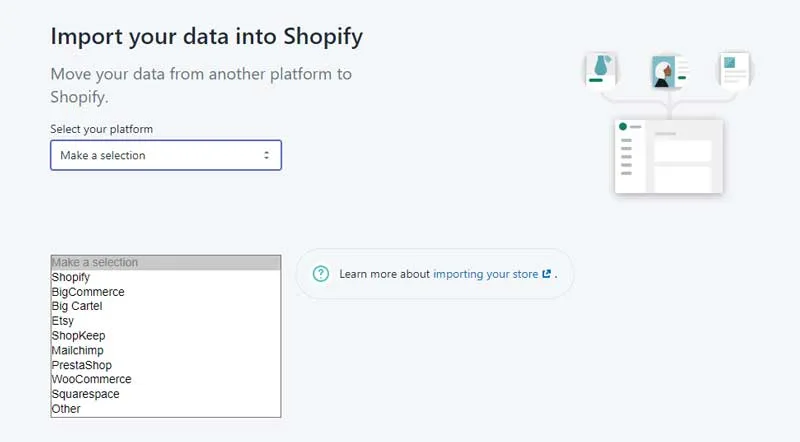
Follow the instruction for the chosen platform and you will be able to import all of your products easily.
What do I do if I never had an eCommerce store before?
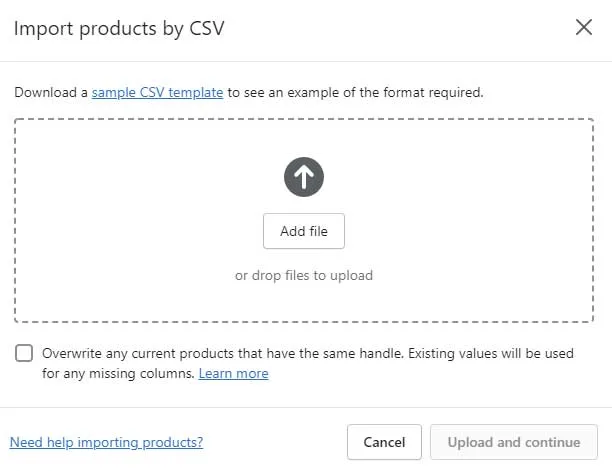
Well, if you don’t have other platform but have a lot of products data, then you will need to use Shopify Import Products by CSV.
The basic idea of importing through CSV is that you’ll be able to import a lot of data easily using a pre-formatted CSV that has been readied by Shopify.
Check Shopify Manual on How to Import Products on how to do this.
I need to warn you though, once you get into the variation of the product and managing each variation’s picture or video, it will become a little bit challenging setting up the CSV file.
There are other methods out there utilizing Shopify Apps to import and sync products from outside channels, but we will not going to discuss it here.
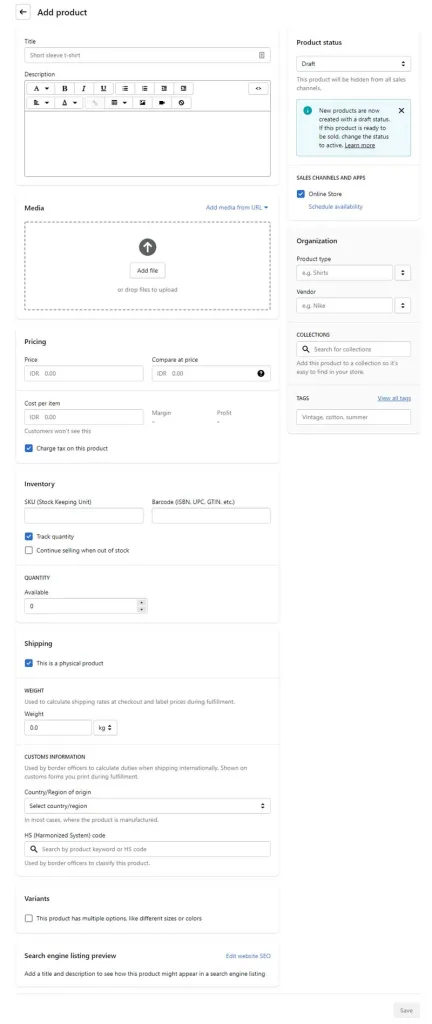
Adding New Products
If you have no products to import but would like to create a product to sell, then by all means we can do that by going to Products -> Add Product.
This is by far the easiest method to add a new product if you have less than 10 products, if you have more than 100 though, we highly recommend to check Shopify Manual on How to Import Products.
Below is a screenshot of what the Add Product page looks like from the admin perspective.
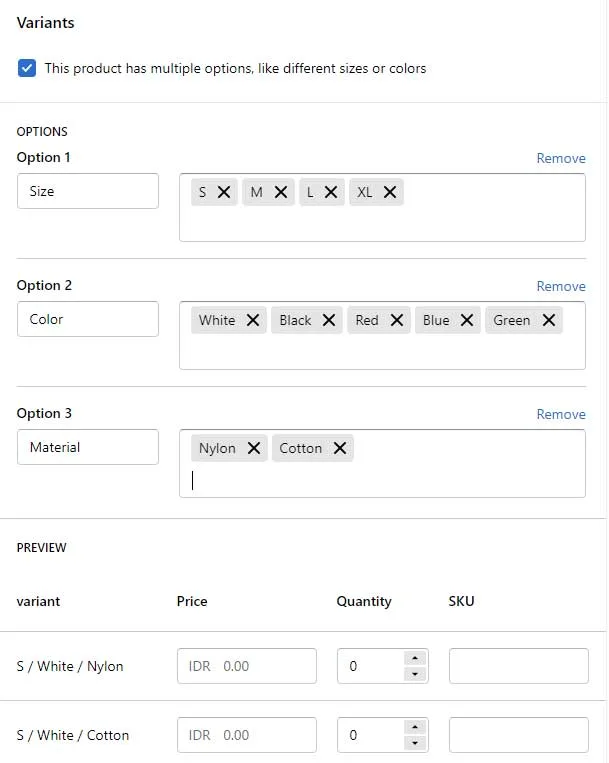
Variants
The main point is if you have the same product with multiple options (e.g. color and size for a t-shirt), then you have to use variants. Shopify allows you to have a maximum of 3 variants using their core functionalities, however, some third-party apps able to forego that limitation completely.
By using variants we can control how many option a product has within one single product page instead of creating multiple products with one specific variant.
The maximum limit of a combination for Shopify variants are 100. This means if you have 5 sizes and 10 colors of a product, then you can only have a maximum of 2 material variant on that product.
Collections and Tags
Collection is the heart of a Shopify store and any eCommerce store in general.
Have you noticed that a product that you’re selling might belong to multiple categories at once?
For example, a Men’s Top Sportswear can belong to the Men section, to the Sportswear section, to the Fitness section, to the Basketball section, and many more.
You would want all of these categories to list that Men’s Top Sportswear that you’re selling, since it actually fits into all of these categories that you have.
You want to have the same item listed in your product database, but it must be available to view under the different categories, tricky isn’t it.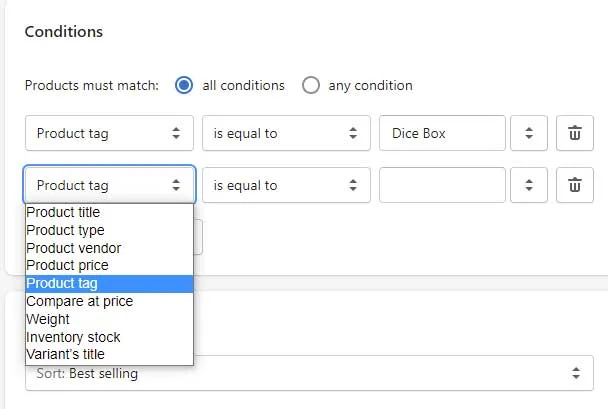
Collection is the answer that Shopify comes up with to solve this issue. With collection, we can select or auto-select products from the product database into each collection that fits the rules we set up.
For the example above, we can create one collection for one category, which means we will have Men collection, Sportswear collection, Fitness collection, Basketball collection. Each of this collection will auto-pick based on different tag.
The key is to set up the tag so that the product will be included within all of those collections you’d like it to show.
That’s where tags come in. Each product will need to have enough tags so we can categorize them in different ways. There are themes that use tags to show additional information below the products controlled within different pages.
Tags are very powerful tool that we need to use them properly to bring the best of an eCommerce store using Shopify and its amazing apps.
Optimizing Your SEO
We will be focusing our discussion about SEO specifically to On-Page SEO. To maximize the usage our On-Page SEO, will need to improve the content of their articles / blogs section.
There is no other way to go around this, all the products, images, and blogs matter a lot in increasing the SEO ranking from the On-Page perspective.
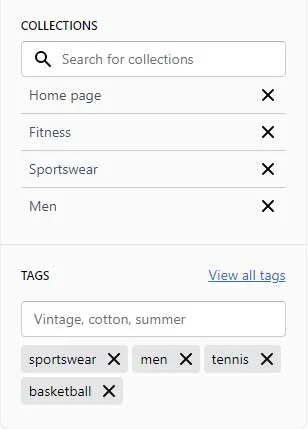
Each page within Shopify has a built-in SEO setup located at the bottom of the page. The following is an example of an SEO setup for a product.
Page Title is what we call the Title Tags.
Description is what we call Description Tags.
Title Tags
Title tags are HTML elements that determine the web page title. Title tags tell humans and search engines about certain pages. Thus, they are important for SEO, and usability. Here are some guidelines that will help you write friendly (and interesting) title tags:
- Each page on your Shopify store must have a unique page title.
- The page title must explain what the page is all about. The more specific the title is, the better. Here are some ways to make your product page title more descriptive: Include serial numbers for electronics; Include the materials of the item (e.g. bamboo toothbrush, porcelain cup, nylon shirts, cashmere sweaters, leather jackets, etc.); Determine what they are used for (e.g. wine glasses, coffee cups, etc.); Include specific styles for art or home decoration (e.g. Scandinavian design) and more.
- Write a compact page title. Shopify has 70 characters limitation. However, Google displays only 50-60 first characters of the title tag. So, we recommend to keep your title tag under 60 characters.
- Use your target keywords in your title tag. We highly recommend to always use keywords at the beginning of the title.
- Avoid keywords repetition (including repeating your keyword variants). Repeated information does not provide unique value and make your title look spam.
- If necessary, use a symbol (such as parentheses and hyphens) to highlight important points and make your page title more attractive.
Description Tags
The meta description tag of a web page offers a brief summary of the page. Google doesn’t use meta description tags as a direct rating signal. But a well-written meta description can entice customers to click on your link, which is able to improve your CTR (which is a ranking factor). Therefore, writing web optimization-friendly meta descriptions (that drive clicks and conversions) is an integral part of your On-Page SEO technique. Here are a number of pointers you possibly can follow:
- The meta description tag should complement the title tag. Do not repeat or paraphrase the title. Instead, use the meta description to provide additional value. A good rule of thumb is to put yourself in your client’s shoes. “What would make me click on that link?” Then, ask yourself some observe-up questions. If you’re writing the meta description of your homepage, ask your self what would potential patrons want to know about your corporation and brand. If you’re writing the meta description of one of your product pages, ask yourself what would make your customers purchase this product, how would it not make their lives simpler or higher, why ought to they purchase it from you, etc. Use your meta descriptions to answer these questions.
- Write concise meta descriptions. You’ve in all probability heard that meta descriptions are like elevator pitches. This means that they need to be persuasive, complete and, nicely, brief. In Shopify, the character restrict for meta descriptions is 320 characters. However, according to Moz, Google only shows the first 150 -160 characters of meta descriptions. So, keep your meta descriptions under 160 characters.
- Include your target keywords in your meta descriptions. It can be a great apply to incorporate LSI keywords in your meta descriptions – this can help search engines perceive the topic of your pages better.
- Good copywriting is the backbone of meta descriptions that drive visitors and conversions. So, be daring. For instance, use capital letters to highlight a promoting level. However, ensure that it doesn’t look spammy and do not go overboard (otherwise your customers would possibly get the feeling they’re being screamed at or get overwhelmed by your enthusiasm).
- Write compelling endings. You can end some of your meta descriptions mid-sentence – just ensure it is clear that you did it on purpose. Try to inform a story and create a “wow” issue. And choose the words that convey your message in the absolute best method.
- Include CTAs and give customers attractive reasons to click in your hyperlink and buy your product.
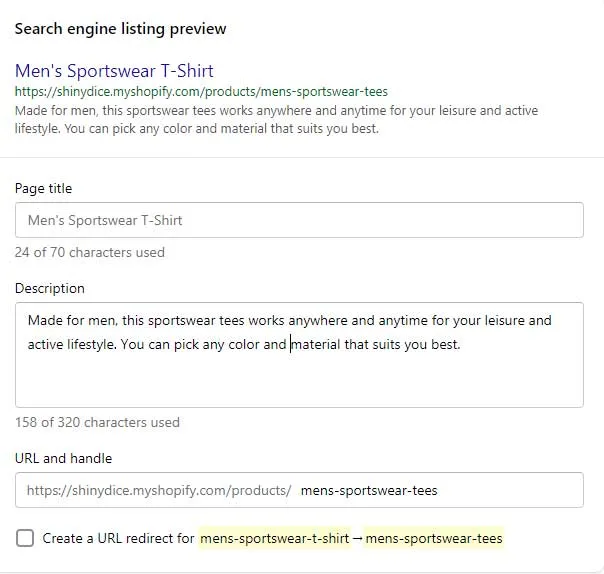
Image Naming Convention

We add images through the Media section within the product page. Shopify always recommend following their guidelines on image formatting before uploading them, we also recommend to think about the image naming convention.
Though they’re not as important as the alt tags, it’s always a good idea to keep your images names standardized:
- Do not use default image names corresponding to 0001.jpg – they are too generic and don’t provide search engine optimization value. In addition, since Google won’t be capable of perceive what this image is about, it is extremely unlikely that it’s going to appear in Image results.
- Use short and descriptive picture file names. Include keywords. For instance, if the picture is of a black leather-based Biker jacket and the goal keyword is “Biker jacket”, the image file name ought to be “black-Skateboard -Jacket.jpg” or “Black-Skateboard-Leather-Jacket.png” (depending on the picture file type).
- Separate the words with dashes (“-”), not underscores (“_”).
- When naming your picture information, consider how your prospects look for merchandise like this – what key phrases or keyword phrases they use, in what order, etc.
Alt Tags
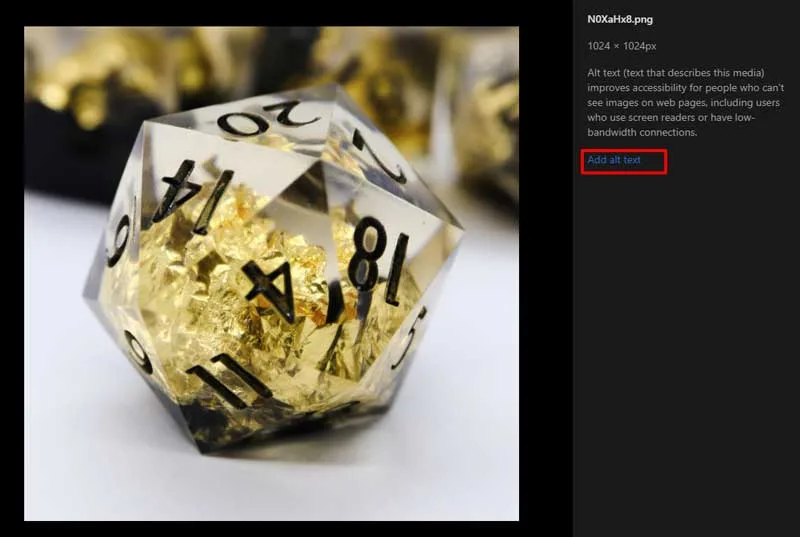
Alt tags (also known as “alt attributes” and “alt descriptions”) are HTML attributes applied to picture tags. To access image alt tags, you need to click on the media where the image is located and it will open a detailed picture showing the image details as well as a button to add an alt tag (or alt text).
The alt tag of an image describes what the image is about. It supplies a textual content that describes the image. We recommend to build alt tags nicely:
- Use dashes, not underscores
- Write descriptive alt tags
- Avoid utilizing big phrases, keep it simple
- Use keywords (however keep away from keyword stuffing)
Optimizing Content
Optimizing Content Creating high-high quality related content material is important to on-page web optimization. There are a number of issues you should focus on when it comes to writing such content on your Shopify web site. First and foremost, you must write detailed product descriptions that shall be useful to your clients. Writing such descriptions will reduce the variety of skinny content pages in your web site. It may even allow you to present more knowledgeable person experiences. Here’s how to do that:
- Put yourself in your customer’s shoes and ask yourself what would you want to know about the product. What are its benefits? How can it be used?
- Talk concerning the product features and what makes it distinctive, i.e. spotlight the product’s USPs.
- Give your clients a purpose to purchase this product from you and never out of your competitors. In other phrases, clarify why your product is healthier. For instance: is it faster, is it simpler? Is it higher quality? Is it eco-friendly? Is it sustainable?
- Use social proof – add reviews and testimonials to your product pages and leverage the facility of your most dear asset: your loyal customers.
- Include useful supplementary content similar to a currency converter, for instance (bear in mind the takeaways from Brian Dean’s listing of Google rating elements).
- Add UGC (user generated content) photographs.
- Use 3D models and videos to make your product pages more engaging and provide more immersive buying experiences, and extra.
Second, you need to use key phrases:
- Strategically incorporate your target key phrases in your product descriptions, class page descriptions, on your homepage, and so on.
- Use lengthy-tail key phrases and LSI key phrases to add value to your content and establish yourself as an authority in your niche. Remember that LSI key phrases will also help search engines like google understand the topic of your pages higher.
- Learn the way to discover keyword concepts in your Shopify retailer
Third, think about starting a weblog and write articles your clients will find useful, inspirational, or participating. For instance:
- If you sell apparel, you can write articles with fashion suggestions, or how-to guides – say, a guide to creating a walk-in wardrobe in your bed room.
- If you promote house decor and furnishings, you can get inspired by IKEA and share recommendations on the way to design a stress-free bed room, how to arrange your kitchen in a way that saves area, or the way to design a magical balcony with a relaxed outside eating area.
- If you sell homegrown spices, you can share a ton of recipes, perfect for different occasions and seasons. You get the concept!
Managing Your Shipping & Taxes
These 2 items are critical before we can do any selling. Both of them are located within the Settings area inside Shopify main panel.

Shipping Rate
Setting a shipping rate should be easy depending on the delivery service you’d like to use.
You have to find the appropriate shipping & delivery service app within the Shopify Apps Store and install the right app within your Store.
This app will automatically adjust the rate based on the ongoing rate for that delivery service.
If you’d like to set up the shipping rate manually, then all you have to do is click on Settings -> Shipping and edit the rates accordingly based on your delivery area (usually a country or multiple countries).
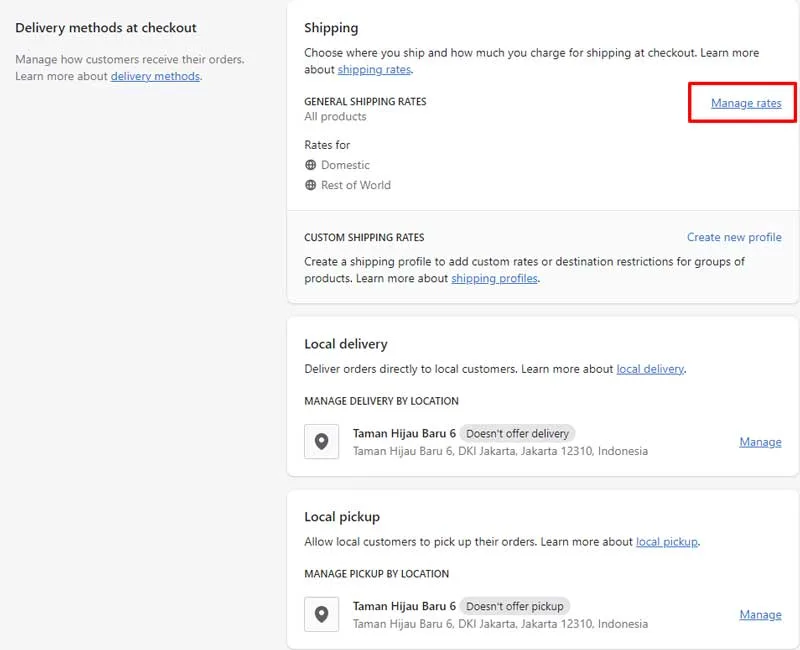
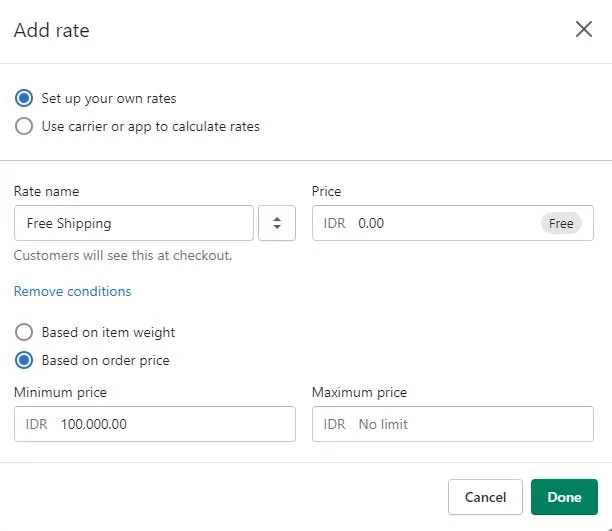
If you have your own shipping calculation, such as conditional free shipping for order above certain amount, then you can set your own rate by adding a new rate with some conditions.
Here’s how it looks like within Shopify. Note selecting an app to calculate rate is the easiest way to go about this.
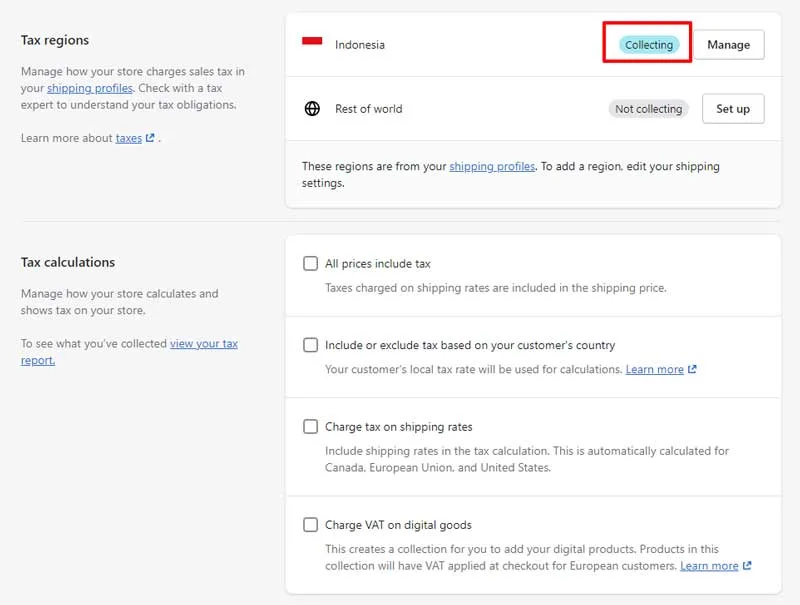
Taxes
For the tax, Shopify will know your location automatically based on your registration information. They will apply the tax region and mark your tax calculation based on that. However, each product will have their own options to include tax or not.
This is the tax region setting within Shopify that lets you manage all taxes calculations. Shopify assigns 10% tax for Indonesia (based on the country’s tax rate).
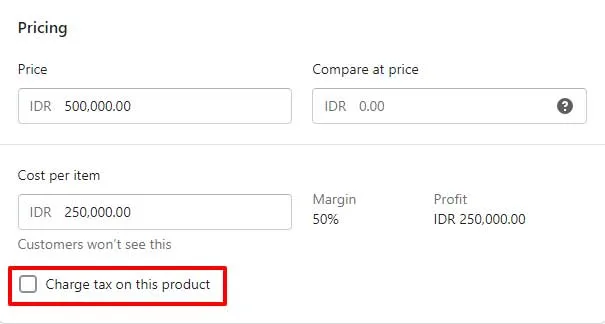
Within the product page, you can assign whether or not the product will be taxed by marking the checkbox “Charge tax on this product” under Pricing section.
If this section is unchecked, then Shopify will not include tax when creating any invoice that includes the current product.
Setting Up Your Payment Gateway
Shopify has its own payment system called Shopify Payments. They do have their own strict requirements to follow, including operating your business in one of the supported countries and aren’t considered a prohibited business, but you can activate Shopify Payments in just one click and pay 0% in extra transaction fees.
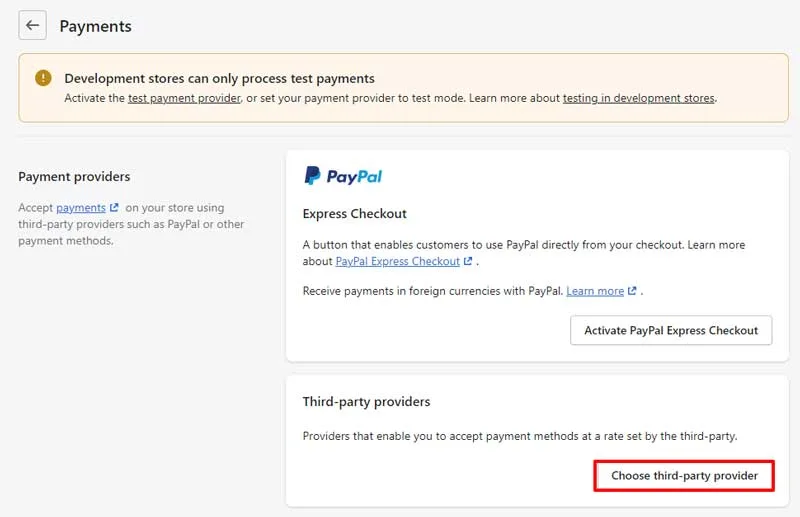
In our case, since we’re outside of the supported countries above, we’ll focus on the third-party providers. We can begin by going to Settings -> Payments.
Within the area you will find that PayPal Express Checkout will be offered as the first option. However, we want to accept major credit cards that are available within Indonesia, and thus we will click on the choose third-party provider button.
The next area will list all the providers that are available and unavailable to use within our current country. Shopify will automatically list those that are available at the top. In the example below, we can choose any of the options listed.
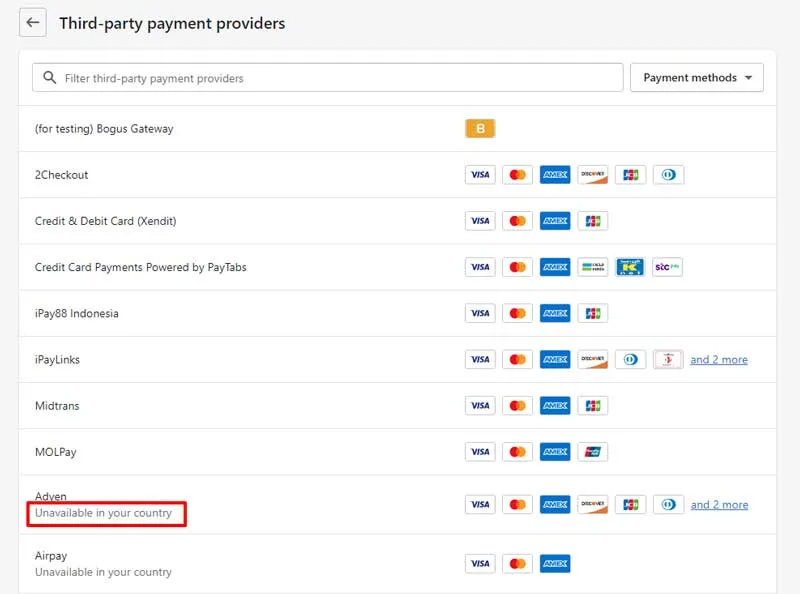
In my case, since I’m familiar with Midtrans, we’ll go with that.
The next section opens up the setting to connect with our Midtrans account.
As you can see, it’s easy to set up a payment gateway once you have an account set up with the provider. The credit cart transaction fee will depend on the payment gateway itself, but Shopify has made it easy to connect to them.
![]()
Registering Your Domain
Your eCommerce won’t be complete without a custom domain name.
Whether you have already owned a domain name and would like to transfer it to Shopify, or you haven’t even thought about it yet, domain name is a very powerful tool to rank higher for search as well as naming your brand the right way.
There are three main ways to manage your domain:
- Buying a New Domain within Shopify will let you manage it within Shopify
- Transfer Your Domain to Shopify so you will manage it in Shopify
- Connect Existing Domain to allow your domain to point to Shopify but leaving the management of the domain in your current domain provider
Shopify store makes it easy for you to purchase your own domain without a lot of hassle. It is so easy that I would highly recommend to either transfer or buy a new domain within Shopify.
Unless of course you need to have more control then perhaps the connecting option might work best for you.
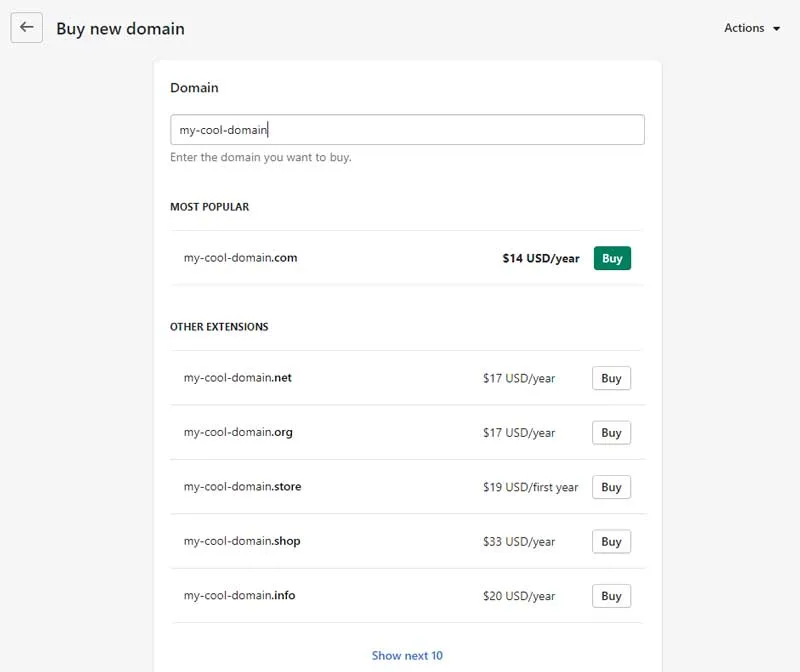
Buying a new domain from inside the Shopify admin panel is as easy as going to Online Store -> Domains and clicking on Buy New Domain button.
You can enter the domain name that works for your brand and purchase it through Shopify for immediate usage within the store.
For more in depth guide on how to manage your domain within Shopify, check this guide.
No matter the option, adding your domain name that represents your Shopify store will have a massive impact for your brand. Do not underestimate the power of your brand, it is, after all, the soul of your business.
Launching Your Shopify Store
Now that your products and Shopify Store front are ready, it’s time to launch your store and activate it for the public to see.
Before we do so however, let’s make sure we go through the following items so not to miss anything.
Domain Redirect
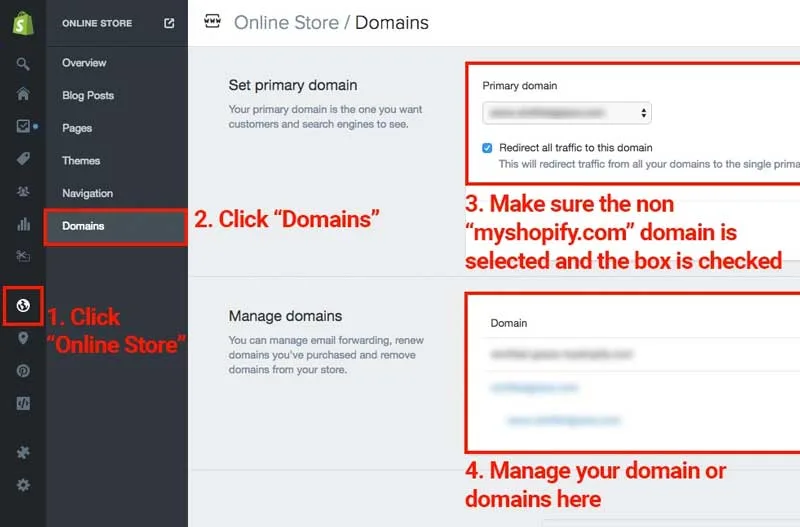
Before we go live we need to make sure that our domains are no longer pointed to the myshopify.com address, so do the following:
- Click on Online Store -> Domains
- Make sure the Redirect all traffic to this domain is checked and selected to the main domain name that you will use for this Shopify Store
Email Notification
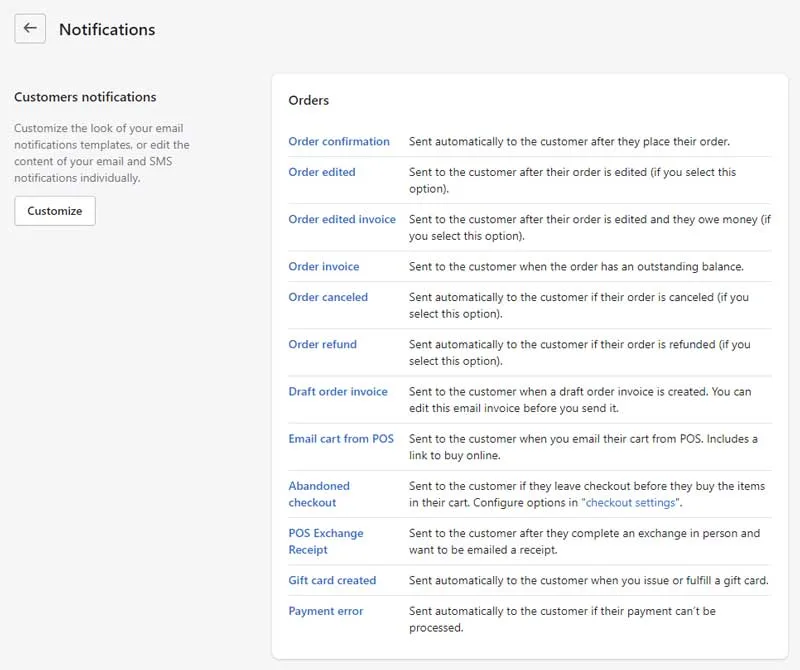
This step is usually optional since Shopify has done a great job of keeping the email notification template in the right way as how you setup your store, however, in case you want to customize every email that comes out from your Shopify Store, you must do the following:
- Go to Settings -> Notifications
- There is a list of all possible email notifications, click on each and preview every single one
- If you’re not satisfied, change the coding within each of the notification so that it fits your brand’s requirements
Store Password Removal
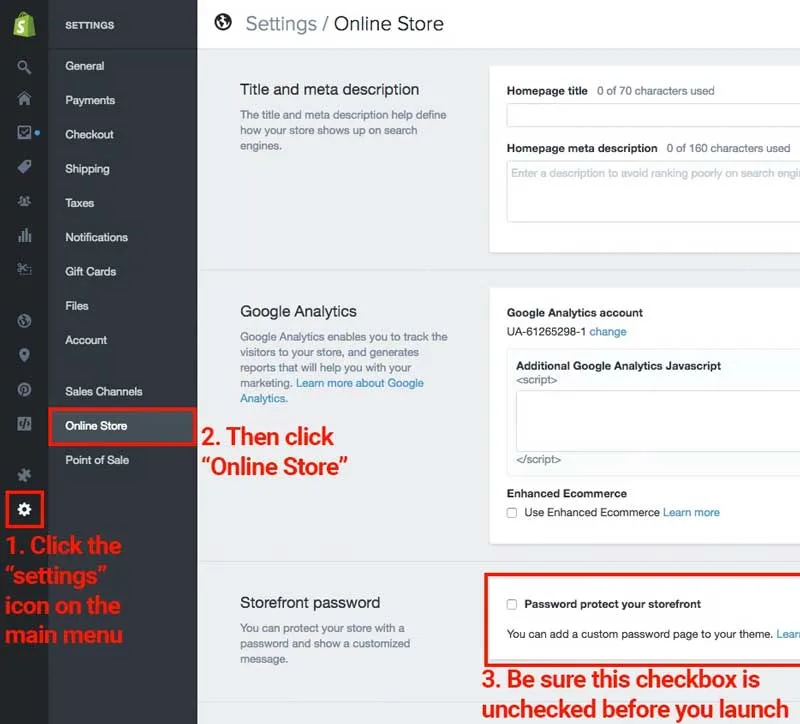
We need to make sure your store is not password protected, otherwise nobody will be able to access it. To unlock the store password you have to do the following steps:
- Have a paid subscription of Shopify
- Go to Settings -> Online Store
- Uncheck the Password Protect Your Storefront checkbox option
Do a Test Order
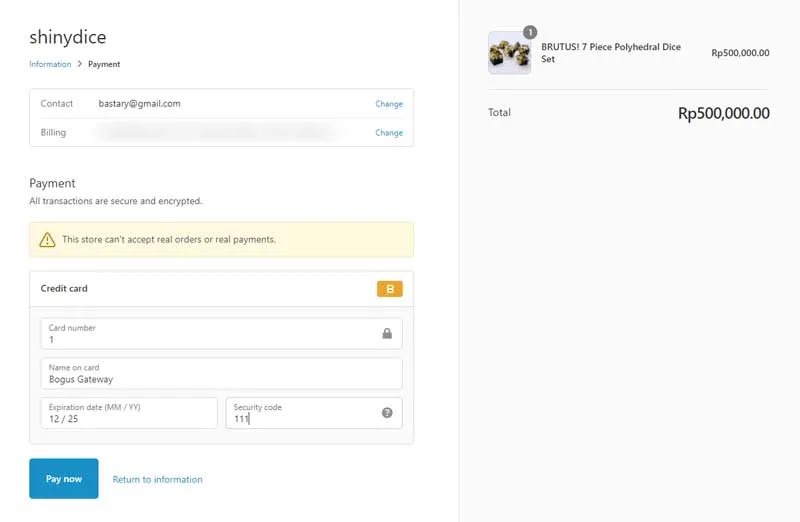
It is equally important to do a test order within your store to make sure that your store and your team are ready to receive orders. To do this, make sure to follow these steps:
- Activate the Bogus Gateway within Settings -> Payments.
- Go to your store, and shop for some items by adding them to cart.
- Checkout by entering the details as follow:
- Card Number: 1
- Name on Card: Bogus Gateway
- Expiration: any date in the future
- Security Code: 111
- You should receive an Order email notification which you can process within the web
To know more how to do a test order, check this Shopify Help Article.
Promoting Your Store
Now comes the hard part! Getting your Shopify Store ready and launched was easy enough, but getting your sales up to the numbers you’d like to see will be difficult.
This is where the Marketing module comes in! To access it, simple click on the Marketing on the main panel module on your Shopify Store’s left menu bar.
You should see a new page called Marketing Overview with a layout similar to this one.
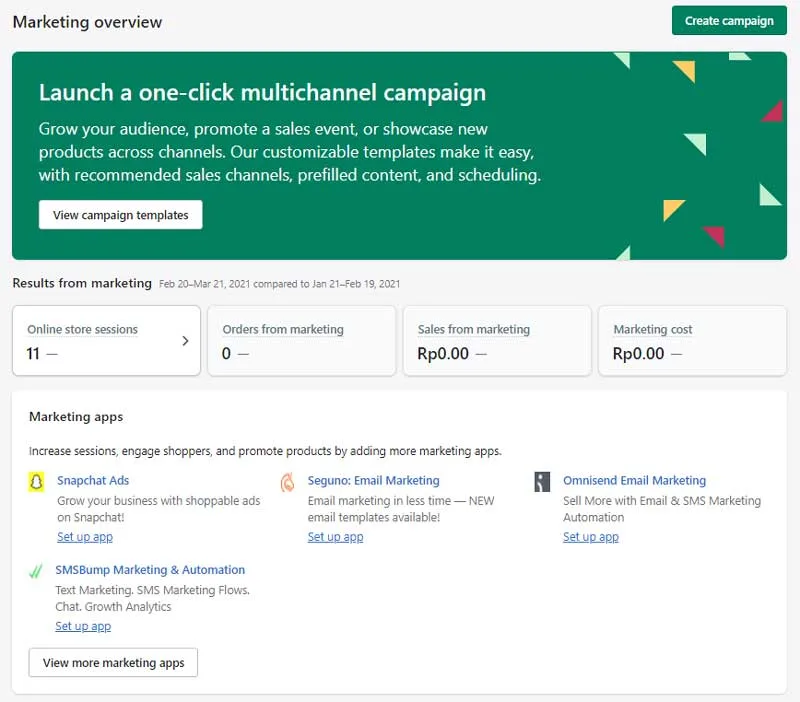
As an eCommerce store owner, we know that it is easier to grab customers that already know your brands and products beforehand, you can redirect them all to your web to register for online coupons, but if you’re new to the business, then this marketing toolkit will help you jump start your brand recognition.
Once you have built enough audience in your email list, then we can utilize email marketing to do multiple different campaigns for your products. We have seen most of the times that big holidays work really well for email marketing campaigns, especially those that are related to Independence Day or religious holidays.
Bonus: Guide on How to Make Your First Sale
Implementing Apps
The final steps are a long process depending on how big your vision for your online store really is. Shopify has made it really easy for users to integrate different functionalities within your eCommerce store without doing it from scratch by way of utilizing Shopify Apps.
What is Shopify Apps I hear you ask? It is a platform where eCommerce owners (Shopify users) can install and implement a plugin made by third-party developers (Shopify App Developer) to work with Shopify stores.
Simply put, any type of additional functionality we would like to have inside our stores, most likely it has already been created previously by someone else, and thus it’s very likely they exist within the Shopify Apps Store.
There are thousands of great apps within the store, it is actually becoming harder to filter for the right apps compared to finding the apps that will serve the functionalities we want.
In fact, it’s becoming a trend to have a curated list of our most loveable apps to choose from the many available. For example, this article by Shopify provides a listing of 27 free Shopify Apps that they suggest.
No matter the needs, Shopify Apps Store will be there for you, and if you’re not sure what to do and where to choose the right combination of apps for you, we can help! We are a Shopify experts team who are able to help you launch your online store to the right space.
Conclusion
Based on the eCommerce software, it is easy to choose the right one depending on the eCommerce need of the business.
The large number of players in the eCommerce software category makes it difficult to zero in on the right one.
There is no perfect way to launch a Shopify store, and if we are waiting too long, we won’t be able to start the journey of selling that we love so much.
Don’t worry about the minor details, as long as we have the crucial features of an eCommerce right, namely the right product and service to sell, the on-time payment and item processing, and delivery & shipping as promised, then we can now concentrate towards the other details such as the FAQs, the chatbots, the landing pages, and many more.
If you want us to handle all of this for you, then don’t be afraid to contact us immediately by either using the contact form or connect with our WhatsApp agent through the link on the right bottom corner of the page.
We hope this article is beneficial for you and your Shopify Store eCommerce journey!